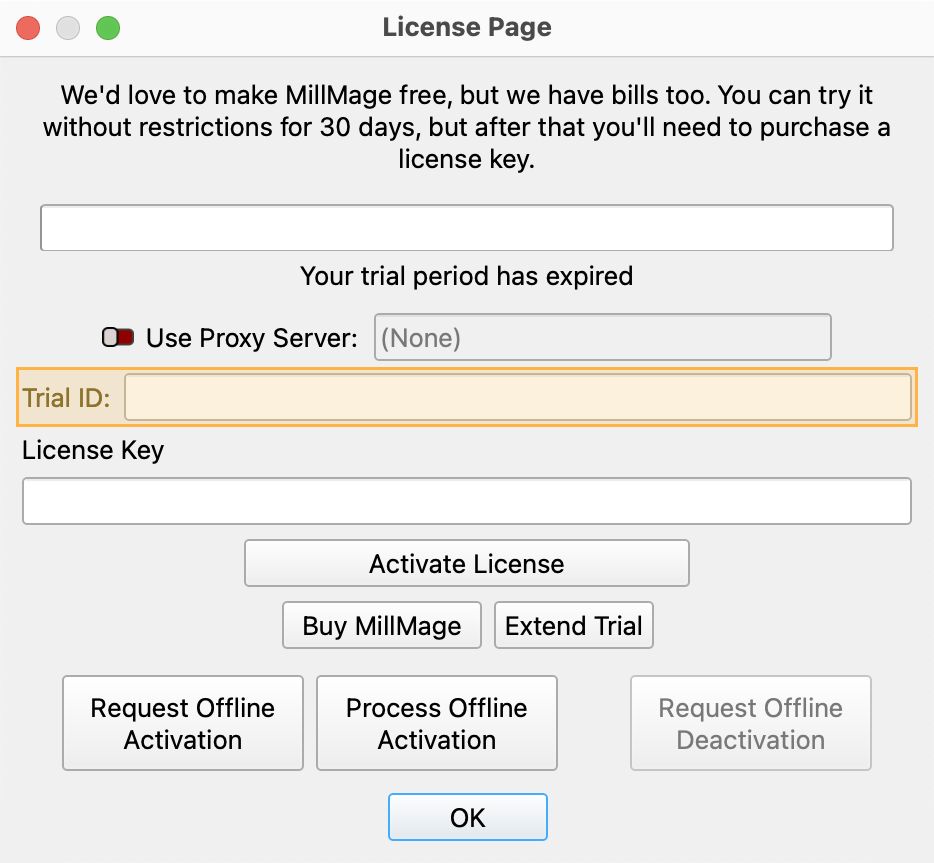
Trial Period or Updates Expiring? Email Trial ID to Support
Thank you for testing MillMage!
Release Candidate users who see a "Your trial period has expired" notice when opening MillMage can request an extension to the update period by emailing the MillMage Trial ID to the Support team.
Find your Trial ID in the License Management window. Email your Trial ID to [email protected] to start your request. The duration of the extended update period may vary.

Warning
The current version of MillMage is a Release Candidate — a stable version of software that is nearly ready for official release, but in need of additional public testing. Please report any unexpected behavior in the MillMage Software Questions section of our forum, including screenshots and as much detail as possible. Ask hardware compatibility questions in the MillMage Hardware Compatibility section.
Users new to MillMage should follow the Getting Started guide.
Video: How to Use a Release Candidate
This video features our sister software, LightBurn. While there may be slight differences in appearance and layout, the demonstrated processes are similar in MillMage.
Warning
This documentation is in active development and in a prerelease state. These documents are not complete and may include missing pages, broken links, and placeholders. Content is being updated as feedback is reviewed. Your patience is appreciated.
Measure
LightBurn Video
This video features our sister software, LightBurn. While there may be slight differences in appearance and layout, the demonstrated processes are similar in MillMage.
Quick Reference: Measure
-
Location
Tools → Measure
-
Keyboard Shortcuts
Windows: Alt+M
Mac: Option+M
-
Keyboard Modifiers
Hold Shift while dragging a temporary line to lock it to horizontal, vertical, or a 45 degree angle.
Use the Measure tool to hover over any shape in your Workspace and display an array of useful information about it, including perimeter, overall dimensions, whether it is Open or Closed, and the lengths of individual line or curve segements within it. You can also click and drag to create and measure a temporary line between two points.
To enable the Measure tool, click on the ruler icon in the Tools Toolbar, or press Alt/Option+M.

Using the Measure Tool
Hover your cursor over any shape in your Workspace to see information on a given shape. Move your cursor over any individual line or curve segment in a shape to see information on that specific segment.
As you hover the cursor over shapes, individual shapes are highlighted in green, and the segment the cursor is currently hovering over is highlighted in purple, as shown below:
Drag Measure
Click, hold, and drag between any two points in your Workspace to display information on a temporary line created between those points. You can snap to a shape or node on a shape, or click anywhere in your Workspace, even if no shape is present.
Hold Shift while dragging to lock the temporary line to horizontal, vertical, and 45 degree angles.
View shape dimensions as you create them
When using any of MillMage's shape creation tools, you can also view the measurements of the shape you're creating in the Status Bar.

Measurement Window
The Measurement dialog window describes the highlighted shape and individual segment. The dialog displays the following values:
| Value | Explanation |
|---|---|
| Nodes | Number of nodes (points at starts and ends line segments and curves) |
| Lines | Number of straight lines |
| Curves | Number of arcs or Bézier curves |
| Perimeter Length | Total length of all line/curve segments |
| Closed/Open | Whether or not the shape is closed |
| Area | The total area of the shape. Empty for open shapes |
| Segment Length | Length of the highlighted line/curve segment |
| Start Point | X, Y coordinate of the start node of the highlighted segment |
| End Point | X, Y coordinate of the end node of the highlighted segment |
| Difference | Difference in X and Y between the start and end nodes |
| Angle | Angle of the line between the start and end points |
| Arc Radius | Radius of the arc, if the curve is a true circular arc. Empty otherwise |
| Arc Center | Center point of the arc, if the curve is a true circular arc. Empty otherwise |
Related Topics
For more help using MillMage, please visit our forum to talk with MillMage staff and users, or email support.


