Trial Period or Updates Expiring? Email Trial ID to Support
Thank you for testing MillMage!
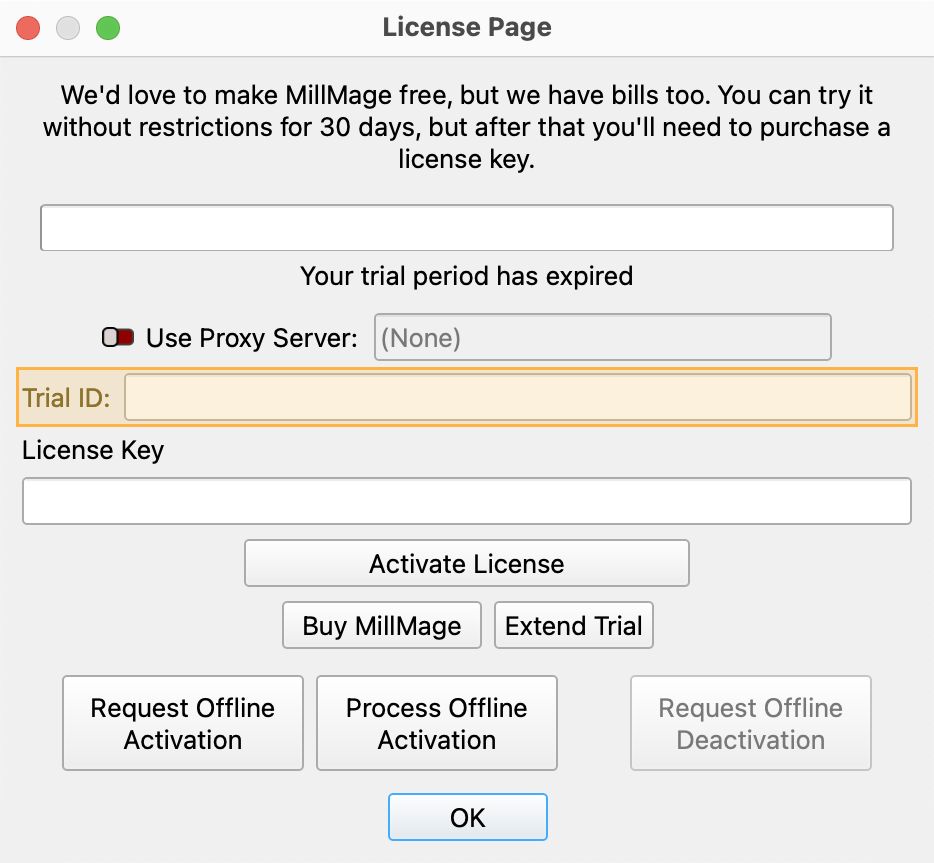
Release Candidate users who see a "Your trial period has expired" notice when opening MillMage can request an extension to the update period by emailing the MillMage Trial ID to the Support team.
Find your Trial ID in the License Management window. Email your Trial ID to [email protected] to start your request. The duration of the extended update period may vary.
Warning
The current version of MillMage is a Release Candidate — a stable version of software that is nearly ready for official release, but in need of additional public testing. Please report any unexpected behavior in the MillMage Software Questions section of our forum, including screenshots and as much detail as possible. Ask hardware compatibility questions in the MillMage Hardware Compatibility section.
Users new to MillMage should follow the Getting Started guide.
Video: How to Use a Release Candidate
This video features our sister software, LightBurn. While there may be slight differences in appearance and layout, the demonstrated processes are similar in MillMage.
Warning
This documentation is in active development and in a prerelease state. These documents are not complete and may include missing pages, broken links, and placeholders. Content is being updated as feedback is reviewed. Your patience is appreciated.
Fluting
Fluting operations create decorative effects on your piece with shaped tools and ramped entry and exit paths. Fluting operations follow an open or closed path like a Profile operation does, but have additional settings for controlling the entry and exit. Combined with appropriate cutting tools, these operations can create a variety of interesting shapes.

Fluting Operation Settings
Click any option in the image below to jump directly to the relevant sectionf or that option, or scroll down for a list of options and descriptions.
Sections that have special settings for Fluting operations are listed first, while common settings that apply similar to most or all other types of operations are listed toward the bottom.
Note
For information on options that are unique to other operations, see Other Operations below.
Fluting Pattern
The Fluting Pattern section is divided up into Entry, Flat, and Exit.
Entry and Exit
Use the Entry and Exit sections to modify the ramped portion of the tool path.
Use the dropdown to set the ramp style to Linear, Fall, Arc, Ogee, or Smooth.
Set the length of the ramped sections in either percentage of the path lenght or distance using the nunmber entry box and the unit dropdown.
Flat
Between Entry and Exit, you'll find the Flat section. This is not configurable and reflects how you've configured the Entry and Exit ramps. This section describes the portion ofthe path between the ramped start and end. The main thing to note here is the distance or percentage, which describes how much of the toolpath is not ramped.
Fluting Preview
The preview section shows a top view and a side view of what your toolpath would like like as a straight line. It shows the width and depth throughout the toolpath. Use this to help you adjust the Fluting settings.
Depths and Entry
The Depths and Entry section allows you to adjust the width and depth of the toolpath.
Start Depth
The depth at which to start cutting. Generally the top of your material.
Final Width
The width of the widest part of the toolpath. This is linked to Final Depth, and increasing it for a non-cylindrical cutting tool will also typically increase the depth.
Final Depth
The depth of the deepest part of the finished toolpath. This is linked to Final Width, and increasing it for a non-cylindrical cutting tool will also typically increase the width.
Depth Per Pass
The depth of material to be cleared with each pass of your router.
MillMage will calculate the required number of passes to achieve the correct Final Depth.
Common Settings
Click here for information on settings that apply similarly to all types of operations
Name
Use this field to edit the display name of the operation in the Operations Window. By default, all operations will be named according to their type.
Paint Color
Click the Paint Color button to open the Select Color window, which controls the color by which the operation will be indicated in the Preview window, if Show paint colors is enabled.


You can choose from a number of Basic Colors presented at the top left of the window, or create a custom color.
To create a custom color:
-
Press Pick Screen Color to hover your cursor over any color on your screen. Click to select the color you're hovering over.
-
Use the color gradient and shading slider at the top right.
-
Adjust numeric or hexidecimal values at the bottom right to create a custom color.
-
After creating a custom color, click Add to Custom Colors to save it for future use.
Click OK to apply the color to your operation, or Cancel to exit the window thout applying the color.
Output
Controls whether the operation will be sent to your CNC when you Preview your project, press the Start button in the Job Control Window, or save your project in GCode format.
Auto Use Layer
Enable this switch to automatically apply this operation to all shapes set to a given layer. Designate the layer by clicking the button to the right of the switch.
Note
When Auto Use Layer is enabled, you can still Assign Operations to graphics set to any other layer, as normal, but all graphics assigned to the chosen layer will also have the Operation applied to them.

Tool Setup
Select Tool
Press the Select Tool button to open your Tool Library and select a tool to assign to the operation.
MillMage will automatically filter for appropriate tools for the type of operation you've selected. Some operations require specific tool geometries — if a tool's geometry is not appropriate for the type of operation you've selected, it will be unlisted and not selectable.
Tool Information
The remaining fields in this section display information about your selected tool, as entered in the Tool Library.
Tool Name
The name you gave the chosen tool in the Tool Library.
Diameter
The diameter of the cutting edge of your tool.
Cut Length
The length of the cutting edge of the chosen tool, from the top to the bottom of all flutes.
# of Flutes
The number of flutes on the chosen tool.
Feeds and Speeds
The Feeds and Speeds saved to a given tool from your Tool Library are automatically entered in the Operation Settings Editor when you select that tool.
To enter speeds in units other than what's set in Device Settings, enter the measurement including in/" or mm to specify the units you want. MillMage will automatically convert to the appropriate units as shown in the example below.

What Feeds and Speeds should I use?
The proper Feed and Speed settings depend on your tool, machine, material, and use case. In short: there's no easy answer to that question.
For specific recommendations, the best resource is usually the manufacturer of your machine or tool.
Feed Rate
Controls the speed at which your CNC will move laterally (along the X and Y axes) during operations.
Ramp Rate
Controls the speed at which your CNC will move vertically (along the Z Axis) during ramp movements.
Spindle Speed
Controls the speed at which your router will rotate your tool.
Note
Not all CNCs allow Spindle Speed control through software. Some have routers which must be adjusted manually.
Plunge
Controls the speed at which your CNC will move vertically (along the Z Axis) during plunge movements.
Chip Load
The Chip Load calculation shows the thickness of material removed by each cutting edge of a tool, during a single revolution of the spindle.
Chip Load = Feed Rate / (Spindle Speed (RPM) x # of Flutes)
The optimal Chip Load varies according to your tool and material. For specific recommendations, the best resource is usually the manufacturer of your machine or tool.
Excessively low Chip Loads produce dust, wear out bits more quickly, and risk overheating the tool and burning the edges of cuts. Excessively high Chip Loads produce chips that clear inefficiently, and may overstress and break the bit.
Vacuum and Coolant
Enable Vacuum
Enable this setting to automatically turn on your vacuum system when this operation begins.
This option requires a vacuum system that is connected to your CNC's controller.
See Controlling Vacuum Accessories With Custom GCode for more information.
Enable Coolant
Enable this setting to automatically turn on your coolant system when this operation begins.
This option requires a coolant system that is connected to your CNC's controller.
See Controlling Coolant Accessories With Custom GCode for more information.
Other Operations
All types of operations are listed below. Select an operation to learn more about the settings available for that type of operation.
For more help using MillMage, please visit our forum to talk with MillMage staff and users, or email support.