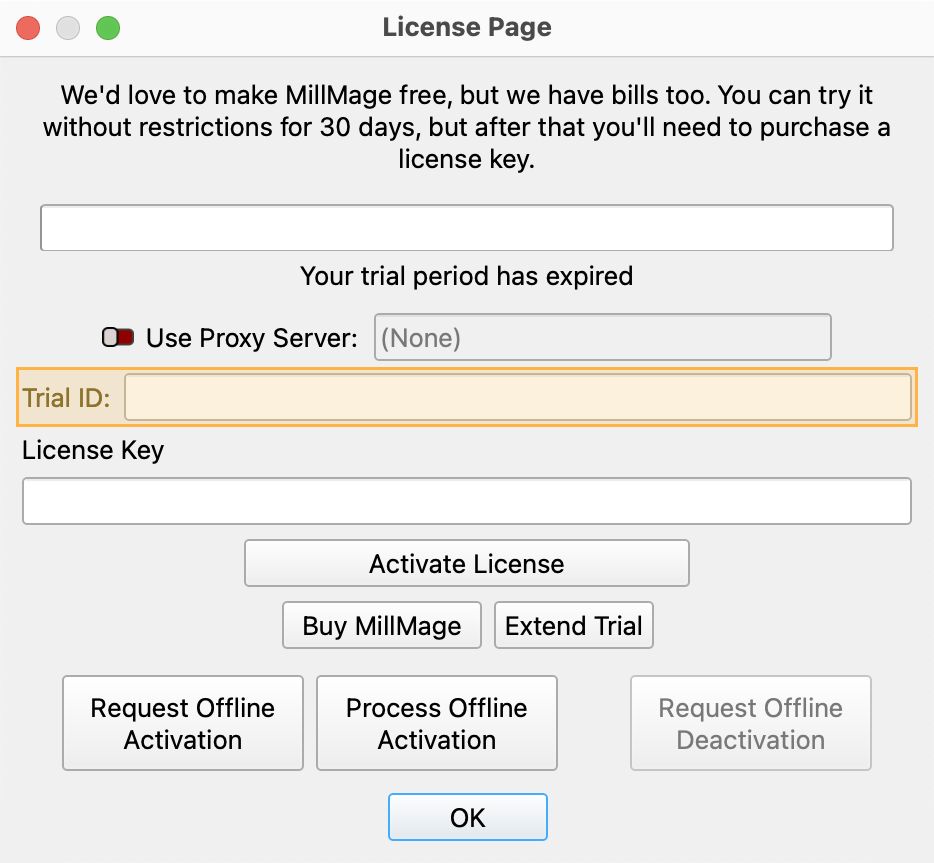
Trial Period or Updates Expiring? Email Trial ID to Support
Thank you for testing MillMage!
Release Candidate users who see a "Your trial period has expired" notice when opening MillMage can request an extension to the update period by emailing the MillMage Trial ID to the Support team.
Find your Trial ID in the License Management window. Email your Trial ID to [email protected] to start your request. The duration of the extended update period may vary.

Warning
The current version of MillMage is a Release Candidate — a stable version of software that is nearly ready for official release, but in need of additional public testing. Please report any unexpected behavior in the MillMage Software Questions section of our forum, including screenshots and as much detail as possible. Ask hardware compatibility questions in the MillMage Hardware Compatibility section.
Users new to MillMage should follow the Getting Started guide.
Video: How to Use a Release Candidate
This video features our sister software, LightBurn. While there may be slight differences in appearance and layout, the demonstrated processes are similar in MillMage.
Warning
This documentation is in active development and in a prerelease state. These documents are not complete and may include missing pages, broken links, and placeholders. Content is being updated as feedback is reviewed. Your patience is appreciated.
Convert to Bitmap
Quick Reference: Convert to Bitmap
-
Location
Edit → Convert to Bitmap
Right-click → Convert to Bitmap
-
Keyboard Shortcuts
Windows: Ctrl + Shift + B
Mac: Cmd + Shift + B
Convert to Bitmap turns selected vector graphics into bitmap images.
Vector graphics are made up of lines, curves, and nodes that define the contours of shapes, while bitmap images are made of a grid of shaded pixels.
See Images vs. Vectors for more information on the differences between images and vector graphics.
Although MillMage doesn't utilize raster images in the same way as LightBurn, this feature has been left in place for your convenience.
Using Convert to Bitmap
Select all vector graphics you wish to convert and go to Edit → Convert to Bitmap (Ctrl/Cmd+Shift+B), or right-click and select Convert to Bitmap.
-
At the top of the Convert to Bitmap window you'll see a preview of the bitmap image that will be created. As you adjust the options the preview will live-update.
-
The Render Type option determines whether the resulting bitmap will show just the Outlines of the vector graphics, will Fill All areas between the outlines, or Use Cut Settings to create outlines only for Profile operations.
Note
In order to Render a vector graphic as a solid, filled bitmap it must be a closed shape. See Open vs. Closed Shapes for more information.
-
Set the DPI for the resutling bitmap by manually entering a value into the DPI field, or by adjusting the slider below it. DPI controls the density of the pixels in the bitmap — higher pixel densities lead to sharper images.
-
The brightness value of each pixel is automatically set to 50% gray.
-
Press OK to create the bitmap image, or Cancel to discard the changes and leave the vector graphics as they are.
Related Topics
For more help using MillMage, please visit our forum to talk with MillMage staff and users, or email support.

